


如何在Word上接入DeepSeek
大家平时在用Word的时候,是不是也有过这样的想法:要是能有个智能助手,随时随地帮我翻译、写作或者处理文件,那该多省事啊!好消息来了,DeepSeek-V3 AI模型现在可以嵌入到Word中了,直接在文档里就能调用AI,简直是办公神器!今天我就手把手教大家怎么操作,轻轻松松实现Word接入DeepSeek,效率直接拉满。
DeepSeek-V3是什么?
简单科普一下,DeepSeek-V3是DeepSeek公司推出的最新AI模型,号称国产AI界的顶流。相比之前的V2.5版本,V3在性能、速度和成本上都有很大的提升,甚至可以和国际大牌的GPT-4系列掰掰手腕。它的强大功能让我们在日常办公中可以通过它完成翻译、写作、数据分析等任务,省时省力。
如果你还没有Office,那你可以点击后面的链接获取Office:【Office 365 个人版家庭版】
接下来就带大家一步步搞定DeepSeek接入Word的全过程,别担心,操作并不复杂,跟着做就行。
第一步:获取API Key
要让DeepSeek在Word里跑起来,首先得有API Key,这相当于DeepSeek给你的一个“通行证”。
由于官网服务器资源紧张,已暂停 API 服务充值,所以我们需要其他的方法来获取,具体请看这篇:【获取DeepSeek API】,但最好用官方渠道的API。
系统会生成一个API Key,把这个Key复制下来,保存到一个安全的地方,比如记事本文件。这个Key以后要用来连接DeepSeek的服务。
第二步:配置Word
有了API Key,接下来就是在Word里设置一下,让它能调用DeepSeek的功能。具体步骤如下:
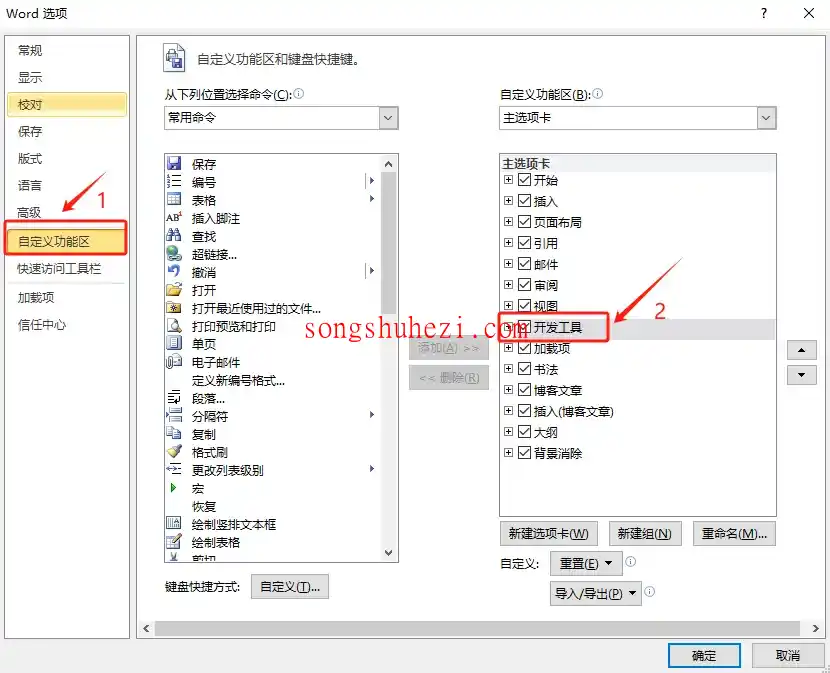
1、启用开发者工具
打开Word,依次点击“文件 -> 选项 -> 自定义功能区”,在右侧勾选“开发者工具”,然后点击“确定”。这时Word的菜单栏里会多一个“开发者工具”选项卡。
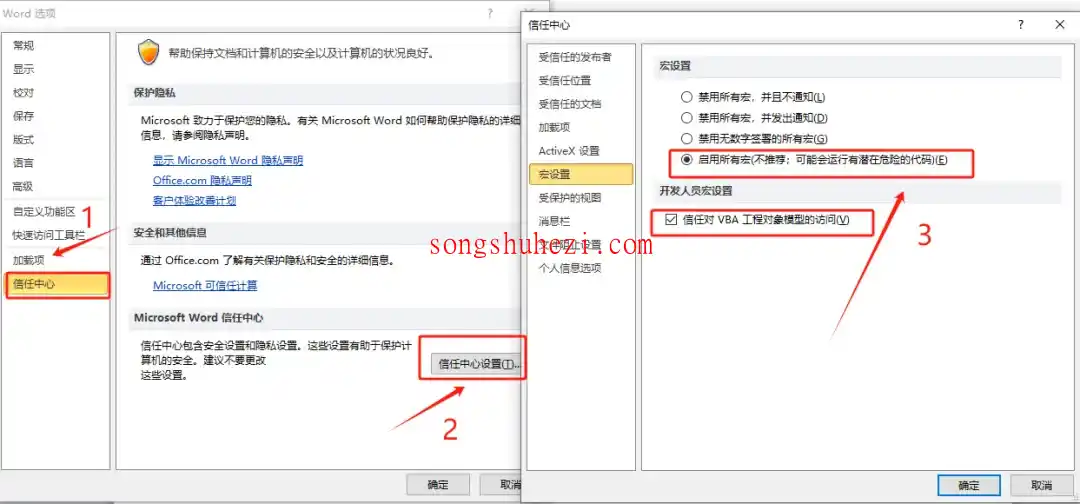
2、调整信任设置
依次点击“文件 -> 选项 -> 信任中心 -> 信任中心设置”,然后选择“启用所有宏”和“信任对VBA工程对象模型的访问”,最后点击“确定”。
3、添加脚本代码
点击菜单栏的“开发者工具”,然后点击左上角的“Visual Basic”按钮,会弹出一个编辑器窗口。
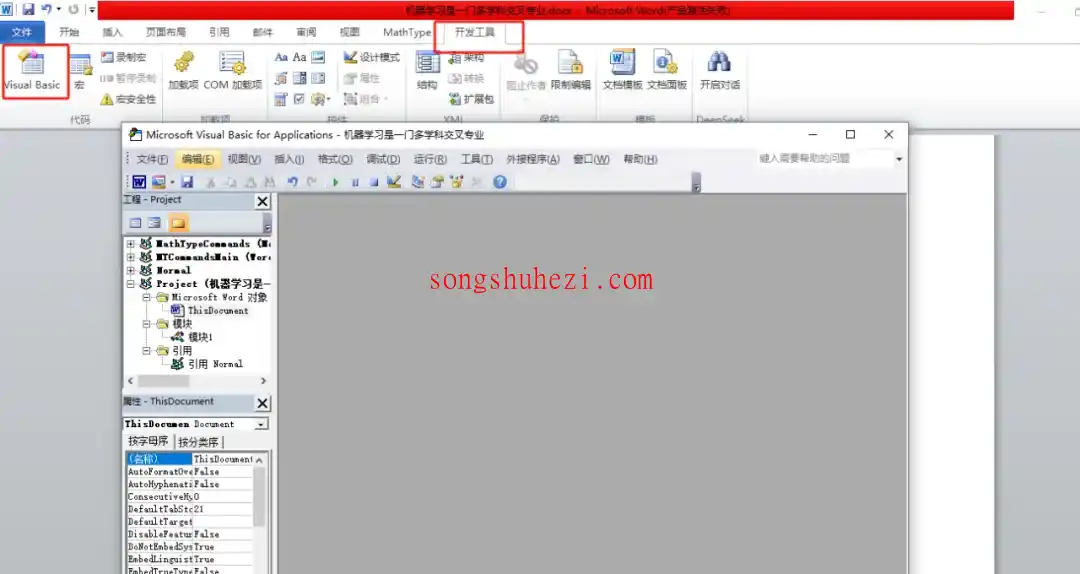
在编辑器里点击“插入 -> 模块”,会出现一个新的代码窗口。

将以下代码复制粘贴进去:
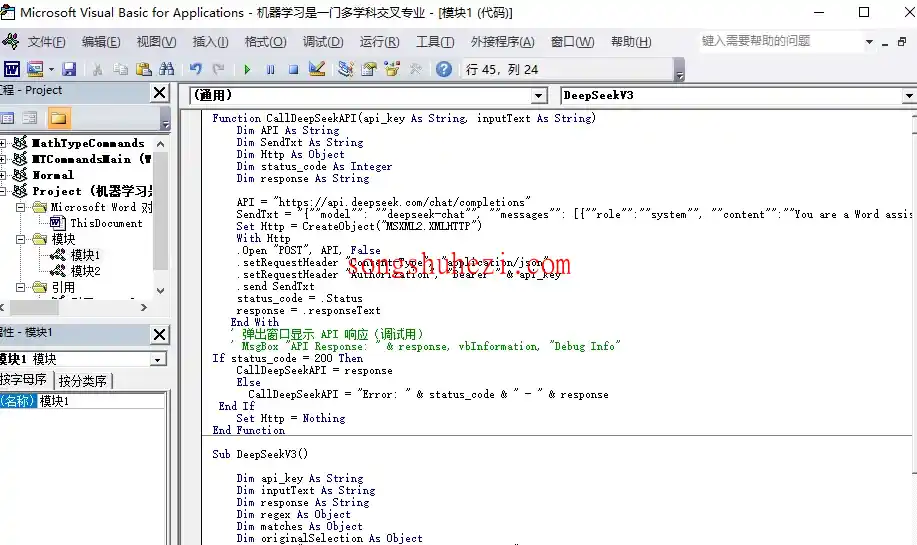
以下是几个完整代码示例,记得替换为你的API Key(如果还没获取API KEY,具体请看这篇:【获取DeepSeek API】):
Deepseek-R1代码(官方apikey)
text
Function CallDeepSeekAPI(api_key As String, inputText As String) As String
Dim API As String
Dim SendTxt As String
Dim Http As Object
Dim status_code As Integer
Dim response As String
API = "https://api.deepseek.com/chat/completions"
SendTxt = "{""model"": ""deepseek-reasoner"", ""messages"": [{""role"":""system"", ""content"":""You are a Word assistant""}, {""role"":""user"", ""content"":""" & inputText & """}], ""stream"": false}"
Set Http = CreateObject("MSXML2.XMLHTTP")
With Http
.Open "POST", API, False
.setRequestHeader "Content-Type", "application/json"
.setRequestHeader "Authorization", "Bearer " & api_key
.send SendTxt
status_code = .Status
response = .responseText
End With
' 弹出窗口显示 API 响应(调试用)
' MsgBox "API Response: " & response, vbInformation, "Debug Info"
If status_code = 200 Then
CallDeepSeekAPI = response
Else
CallDeepSeekAPI = "Error: " & status_code & " - " & response
End If
Set Http = Nothing
End Function
Sub DeepSeekR1()
Dim api_key As String
Dim inputText As String
Dim response As String
Dim regex As Object
Dim reasoningRegex As Object
Dim contentRegex As Object
Dim matches As Object
Dim reasoningMatches As Object
Dim originalSelection As Object
Dim reasoningContent As String
Dim finalContent As String
api_key = "替换为你的api key"
If api_key = "" Then
MsgBox "Please enter the API key."
Exit Sub
ElseIf Selection.Type <> wdSelectionNormal Then
MsgBox "Please select text."
Exit Sub
End If
' 保存原始选中的文本
Set originalSelection = Selection.Range.Duplicate
inputText = Replace(Replace(Replace(Replace(Replace(Selection.text, "\", "\\"), vbCrLf, ""), vbCr, ""), vbLf, ""), Chr(34), "\""")
response = CallDeepSeekAPI(api_key, inputText)
If Left(response, 5) <> "Error" Then
' 创建正则表达式对象来分别匹配推理内容和最终回答
Set reasoningRegex = CreateObject("VBScript.RegExp")
With reasoningRegex
.Global = True
.MultiLine = True
.IgnoreCase = False
.Pattern = """reasoning_content"":""(.*?)"""
End With
Set contentRegex = CreateObject("VBScript.RegExp")
With contentRegex
.Global = True
.MultiLine = True
.IgnoreCase = False
.Pattern = """content"":""(.*?)"""
End With
' 提取推理内容
Set reasoningMatches = reasoningRegex.Execute(response)
If reasoningMatches.Count > 0 Then
reasoningContent = reasoningMatches(0).SubMatches(0)
reasoningContent = Replace(reasoningContent, "\n\n", vbNewLine)
reasoningContent = Replace(reasoningContent, "\n", vbNewLine)
reasoningContent = Replace(Replace(reasoningContent, """", Chr(34)), """", Chr(34))
End If
' 提取最终回答
Set matches = contentRegex.Execute(response)
If matches.Count > 0 Then
finalContent = matches(0).SubMatches(0)
finalContent = Replace(finalContent, "\n\n", vbNewLine)
finalContent = Replace(finalContent, "\n", vbNewLine)
finalContent = Replace(Replace(finalContent, """", Chr(34)), """", Chr(34))
' 取消选中原始文本
Selection.Collapse Direction:=wdCollapseEnd
' 插入推理过程(如果存在)
If Len(reasoningContent) > 0 Then
Selection.TypeParagraph
Selection.TypeText "推理过程:"
Selection.TypeParagraph
Selection.TypeText reasoningContent
Selection.TypeParagraph
Selection.TypeText "最终回答:"
Selection.TypeParagraph
End If
' 插入最终回答
Selection.TypeText finalContent
' 将光标移回原来选中文本的末尾
originalSelection.Select
Else
MsgBox "Failed to parse API response.", vbExclamation
End If
Else
MsgBox response, vbCritical
End If
End Sub
DeepSeek-V3代码(官方apikey)
text
Function CallDeepSeekAPI(api_key As String, inputText As String) As String
Dim API As String
Dim SendTxt As String
Dim Http As Object
Dim status_code As Integer
Dim response As String
API = "https://api.deepseek.com/chat/completions"
SendTxt = "{""model"": ""deepseek-chat"", ""messages"": [{""role"":""system"", ""content"":""You are a Word assistant""}, {""role"":""user"", ""content"":""" & inputText & """}], ""stream"": false}"
Set Http = CreateObject("MSXML2.XMLHTTP")
With Http
.Open "POST", API, False
.setRequestHeader "Content-Type", "application/json"
.setRequestHeader "Authorization", "Bearer " & api_key
.send SendTxt
status_code = .Status
response = .responseText
End With
' 弹出窗口显示 API 响应(调试用)
' MsgBox "API Response: " & response, vbInformation, "Debug Info"
If status_code = 200 Then
CallDeepSeekAPI = response
Else
CallDeepSeekAPI = "Error: " & status_code & " - " & response
End If
Set Http = Nothing
End Function
Sub DeepSeekV3()
Dim api_key As String
Dim inputText As String
Dim response As String
Dim regex As Object
Dim matches As Object
Dim originalSelection As Object
api_key = "替换为你的api key"
If api_key = "" Then
MsgBox "Please enter the API key."
Exit Sub
ElseIf Selection.Type <> wdSelectionNormal Then
MsgBox "Please select text."
Exit Sub
End If
' 保存原始选中的文本
Set originalSelection = Selection.Range.Duplicate
inputText = Replace(Replace(Replace(Replace(Replace(Selection.text, "\", "\\"), vbCrLf, ""), vbCr, ""), vbLf, ""), Chr(34), "\""")
response = CallDeepSeekAPI(api_key, inputText)
If Left(response, 5) <> "Error" Then
Set regex = CreateObject("VBScript.RegExp")
With regex
.Global = True
.MultiLine = True
.IgnoreCase = False
.Pattern = """content"":""(.*?)"""
End With
Set matches = regex.Execute(response)
If matches.Count > 0 Then
response = matches(0).SubMatches(0)
response = Replace(Replace(response, """", Chr(34)), """", Chr(34))
' 取消选中原始文本
Selection.Collapse Direction:=wdCollapseEnd
' 将内容插入到选中文字的下一行
Selection.TypeParagraph ' 插入新行
Selection.TypeText text:=response
' 将光标移回原来选中文本的末尾
originalSelection.Select
Else
MsgBox "Failed to parse API response.", vbExclamation
End If
Else
MsgBox response, vbCritical
End If
End Sub
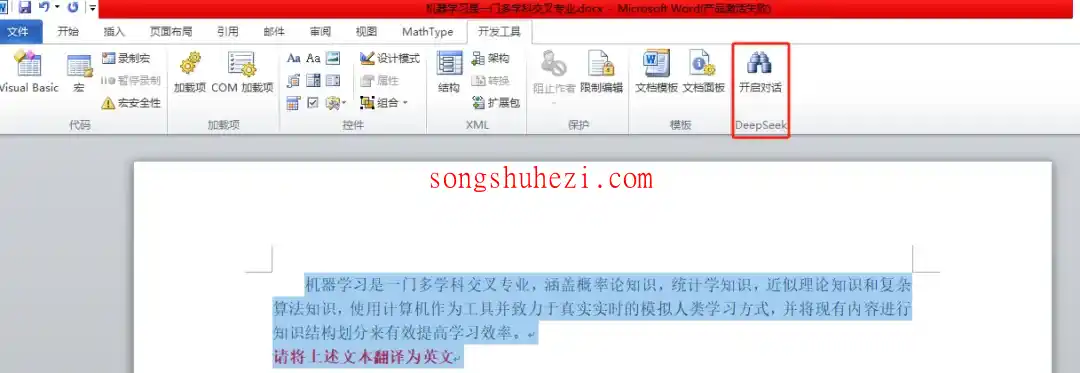
添加自定义按钮
关闭代码窗口,回到Word的主界面。
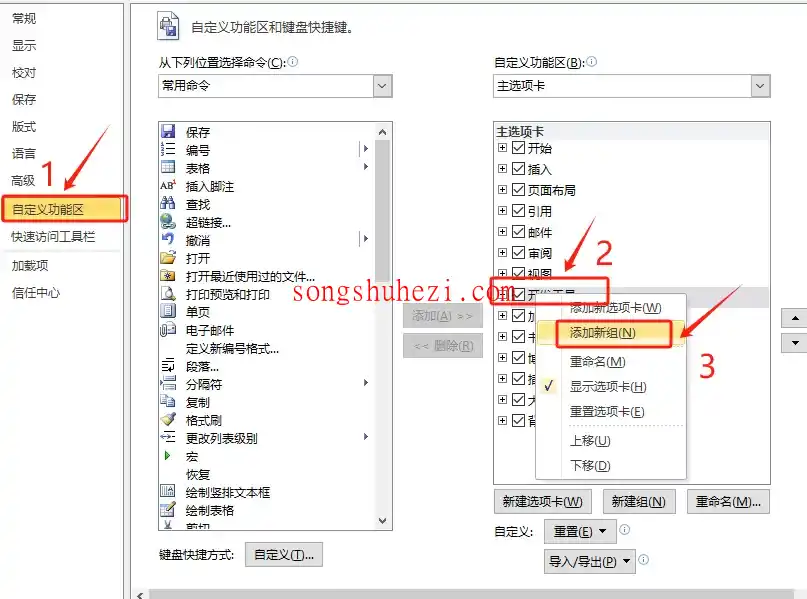
点击“文件 -> 选项 -> 自定义功能区”,右键点击“开发工具”,选择“添加新组”。
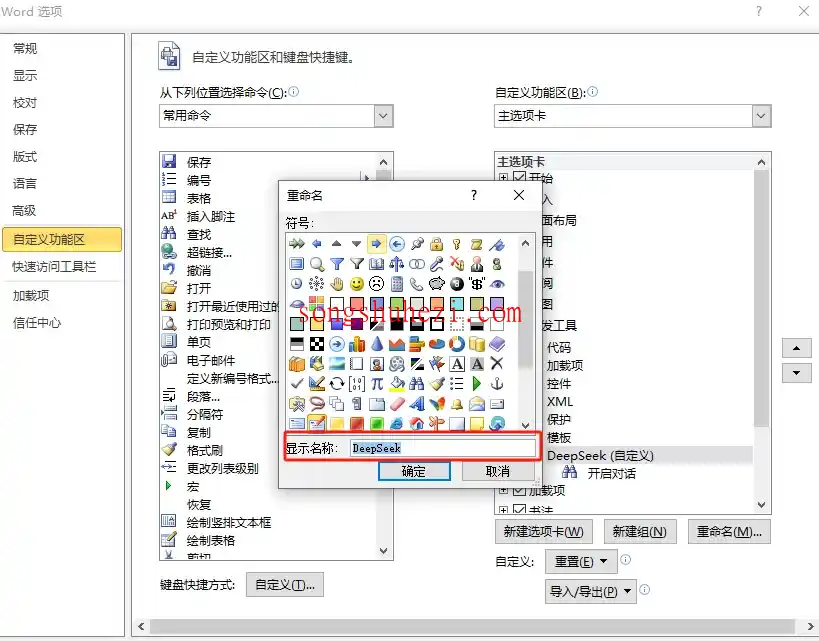
选中新建的组,右键重命名为“DeepSeek”,并选择一个喜欢的图标。
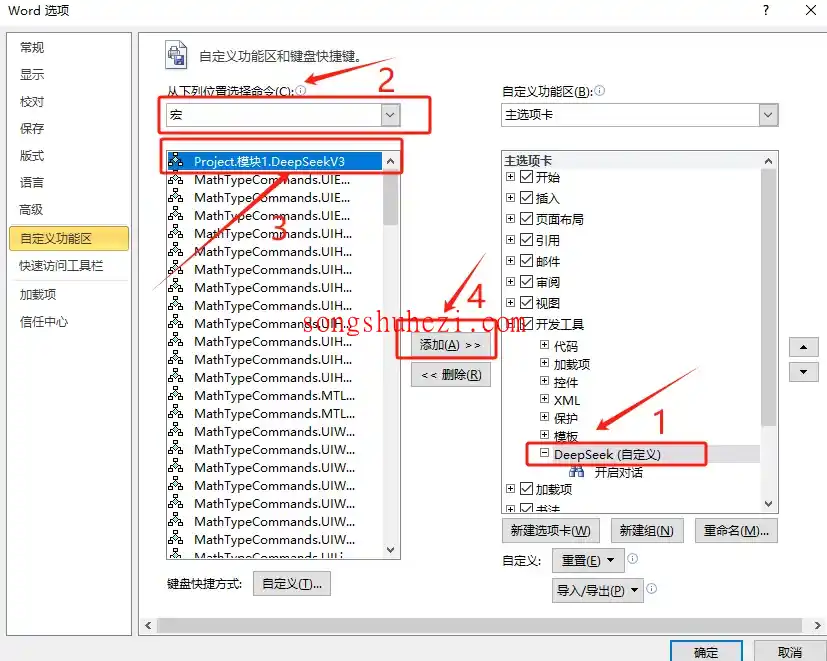
左侧选择“宏”,找到刚才添加的“DeepSeekV3”,点击“添加”到右侧的DeepSeek组中。
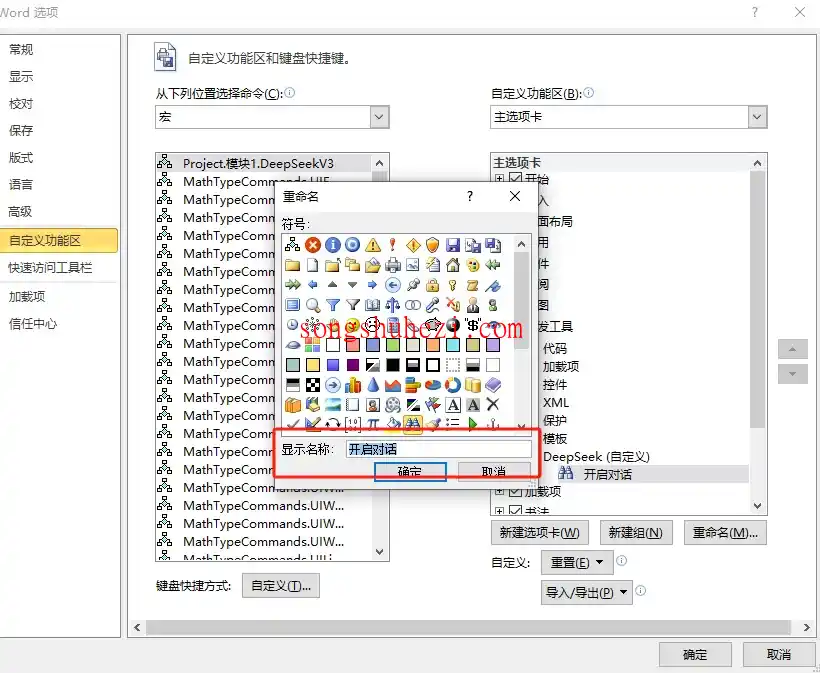
再次右键重命名为“开始对话”,并选择一个合适的图标。
第三步:测试DeepSeek功能
配置完成后,我们来试试DeepSeek是不是成功接入了Word:
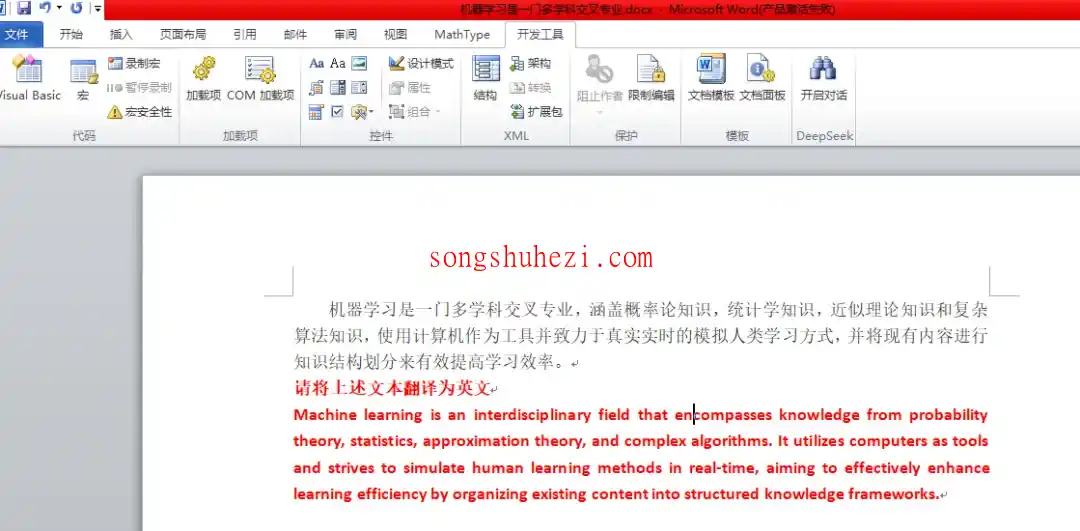
打开一个Word文档,输入一段文字,比如“将上面的文本翻译成英文”。
选中这段文字,点击菜单栏里的“开始对话”按钮。
如果一切设置正确,DeepSeek会自动生成一段文字,并插入到选中内容的下一行。
最后
整个操作下来,其实并没有想象中那么复杂,关键是每一步都要仔细,特别是API Key的保存和代码的复制粘贴。DeepSeek接入Word后真的很方便,翻译、写作、数据处理都能快速搞定,感觉办公效率提升了不少。大家如果需要一个强大的AI助手,不妨试试这个方法,绝对值!
反爬虫抓取,人机验证,请输入验证码查看内容
请关注本站公众号回复关键字:“2024”,获取验证码。
打开微信扫描上方二维码关注微信公众号


 RSS
RSS